Product Information
Hikarikabe installation instructions |
Hikarikabe installation instructions (metal support placed outside)

Hikarikabe installation instructions
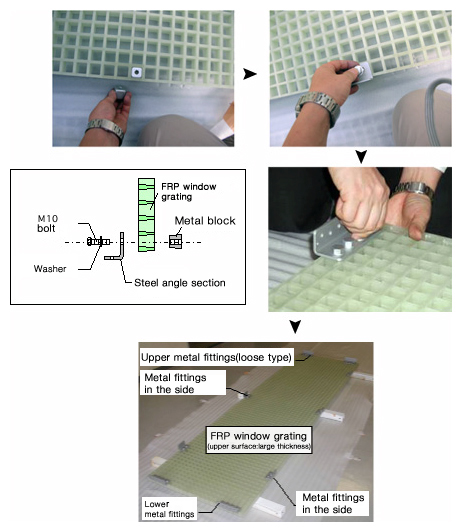
1.Place metal hardware to FRP lattice (temporary joint)
- Temporarily fix (by hand) upper metal hardware (with loose), lower metal hardware and side hardware on appropriate locations in advance.
- Fix joint metal and FRP lattice with M10 bolt (with round washer) via metal block.
(upper metal hardware, lower metal hardware: 4 units each /side metal hardware: 2 units each)

Note: FRP lattice and metal block have taper. Please check each direction when installing them.
2. Installation of self-weight support.
- Place 2 self-weight supports in 1/3 of distance between pillars on each side.
- Use dedicated rubber spacer for self-weight supports (SPG-3, -12, -24).
- Use nail fixation and hexagonal coach screw in case of SPG-3 and SPG-12.24 respectively.

3.Vertically adjust and insert FRP lattice
Vertically adjust FRP lattice material in specified size by placing on self-weight support.

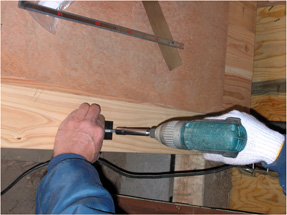
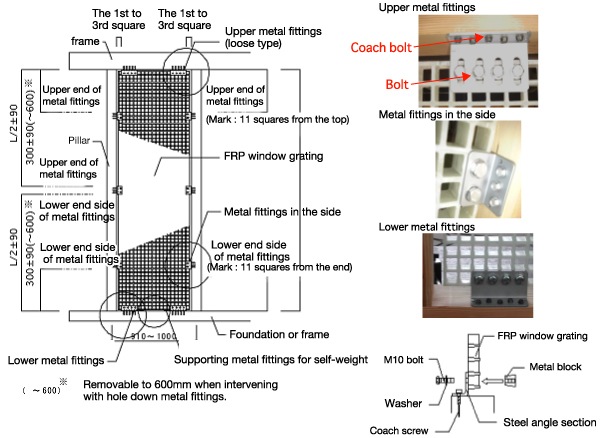
4.Fix upper metal hardware (with loose), lower metal hardware and side metal hardware to the frame
- Install each metal hardware to axial frame by using specified numbers of coach screws .
Note: Do not tighten coach screw too much.

|
*There are holes on metal hardware for temporary joint.
(It makes it easier to properly fix metal hardware using nails in advance.)
|
 |
5.Tighten M10 bolt
- Tighten hexagonal bolt which was temporarily fixed.
Note: Approximately 400kgf.cm is the standard of torque to tighten bolts. |
 |
6. Complete installation
Apply correction paint to metal hardware if necessary.
Notes:
- This product is a finishing product. Please be careful not to scratch the surface during/after installation.
(Protect the surface by taping packaging materials used for delivery on the surface after installation.)
- Do not fix or hang lighting equipment, tool, etc on the lattice part.
- Do not put fingers in lattice part. It may cause injury. Handle carefully during installation.
|
 |
Notes (installation location)
*Comply with installation location of metal hardware as instructed below.
Installation instructions

|
 |
HIKARIKABE Specifications